

Why Potholes Form in Dirt and Gravel Surfaces
Tired of your dirt or gravel driveway feeling more like an obstacle course than a smooth path home? We get it. Potholes are a common headache for property owners, but they’re more than just an annoyance. These recurring depressions can cause significant wear and tear on your vehicle’s suspension, create dangerous driving conditions, and escalate into major repair costs if left unaddressed.
A well-maintained driveway isn’t just about aesthetics; it’s about safety, vehicle longevity, and protecting your investment. Fortunately, achieving a durable fix for these persistent problems is entirely possible.
In this extensive guide, we’ll equip you with the knowledge to tackle even the most stubborn potholes. We’ll delve into the root causes of their formation, detail the essential tools and materials you’ll need, and provide a clear, step-by-step method for effective repairs. We’ll also cover crucial strategies for preventing future potholes, ensuring your dirt or gravel driveway stays smooth and reliable. For those seeking lasting solutions, understanding proper Patriot dirt driveway repair techniques is key to reclaiming your smooth ride.
Potholes in dirt and gravel driveways are not merely random occurrences; they are the result of a combination of environmental factors and mechanical stresses. Understanding these root causes is the first step toward implementing lasting repairs. We often find that water is the primary culprit, with statistics indicating that approximately 80% of potholes are caused by water beneath the surface that isn’t draining properly.
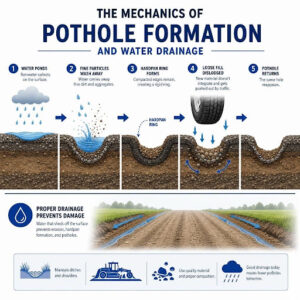
Water pooling on the surface or saturating the subgrade beneath the driveway significantly weakens the material. When water infiltrates the gravel or dirt, it reduces the friction between particles, making the surface susceptible to displacement. Vehicle traffic then exerts pressure on these weakened areas, causing the aggregate to shift and create depressions. This process is exacerbated by freeze-thaw cycles common in many regions. Water expands when it freezes, pushing aggregate particles apart, and then contracts when it thaws, leaving voids that collapse under the weight of vehicles. This constant expansion and contraction, coupled with the shear stress from tires, leads to the formation and deepening of potholes.
Hydraulic pressure also plays a role; as vehicle tires roll over standing water on a saturated road, they can force subgrade fines out, eroding the base material and deepening depressions. This continuous cycle of water intrusion, material weakening, and traffic stress ultimately leads to the familiar sight of loose aggregate being displaced and larger potholes forming.
When selecting materials for repair, it’s crucial to understand the differences in aggregate types.
| Aggregate Type | Characteristics | Best Use for Pothole Repair to ensure proper drainage.
Understanding the Hardpan Ring and Bowl Effect
When water pools on an unpotholed surface, the fine particles in the dirt or gravel are carried away, leaving behind a “bowl” of compacted material. This compacted perimeter, often referred to as a “hardpan ring,” acts like a rigid wall. When new, loose material is simply dumped into this bowl, it doesn’t integrate with the existing compacted edges. Instead, vehicle traffic easily dislodges the new fill, pushing it out of the bowl, and the pothole quickly reappears in the exact same spot. This phenomenon explains why many surface-level repairs fail; they don’t address the underlying mechanical failure of the hardpan. To achieve a lasting repair, this compacted perimeter must be thoroughly broken up and integrated with the new material, ensuring the structural integrity of the entire patch.
The Critical Role of Drainage and Moisture
Inadequate drainage is arguably the single most significant factor in pothole formation. If a driveway lacks a proper crown or has insufficient slope, water will naturally collect in low spots. This standing water then saturates the subgrade, softening the underlying soil and making it vulnerable to the weight of vehicles. This leads to a cycle of fine erosion, where water washes away the smaller particles that bind the aggregate together, further destabilizing the surface.
Soil saturation also reduces the bearing capacity of the driveway, meaning it can no longer support the loads placed upon it without deforming. Stagnant runoff, often exacerbated by blocked ditches or culverts, keeps the subgrade perpetually wet, creating ideal conditions for pothole development. A healthy gravel driveway should have a crown that slopes 2% to 4% from the center to the edges. For a 10-foot wide road, this means the center should be roughly 3 inches higher than the edges to ensure proper drainage and prevent water from lingering on the surface or seeping into the subgrade.
Essential Materials and Tools for Patriot Dirt Driveway Repair
Successful dirt driveway pothole repair hinges on having the right materials and tools at hand. While some basic items might already be in your shed, investing in specific equipment can significantly improve the longevity and effectiveness of your repairs.
For any repair project, you’ll generally need:
- Crushed Aggregate: The specific type will depend on your driveway, but angular crushed stone with fines is often preferred.
- Steel Tamper: Essential for compacting aggregate in smaller areas.
- Square Shovel: For excavating and creating clean edges.
- Rake: For spreading and leveling material.
- Wheelbarrow: For transporting aggregate.
- Crown Gauge (optional but recommended): To ensure proper driveway slope.
- Moisture Sprayer: For dampening aggregate during compaction.
For more extensive repairs or for general guidance on maintaining unpaved surfaces, exploring resources on comprehensive driveway care, such as those detailing effective Patriot dirt driveway repair strategies, can provide valuable insights.
Selecting the Right Aggregate and Base Materials
The choice of aggregate is critical for a durable repair. Simply dumping loose dirt or rounded river gravel into a pothole is often a temporary fix at best. We recommend using angular crushed stone with fines, such as #411 aggregate or crusher run. This material contains a mix of stone sizes, from larger pieces down to fine dust (fines), which interlock when compacted, creating a dense, stable, and almost concrete-like surface. The angularity of the stone provides superior mechanical interlock compared to rounded gravel, which tends to shift under pressure.
In contrast, #57 stone, which is clean 1-inch gravel, offers excellent drainage but lacks the fines necessary for structural binding. While suitable for a base layer where drainage is paramount, it should not be used as a primary fill material for potholes, as it will not compact tightly and will quickly displace. For deeper potholes, a base layer of coarser, angular aggregate (like 5/8 chips) can provide stability and drainage, topped with a finer, compactable mix. Paver base, a blend of crushed stone and sand, can also be an effective composite mix for creating a stable foundation.
Compaction Equipment: Manual vs. Mechanical Options
Proper compaction is non-negotiable for a lasting repair. Without it, even the best aggregate will settle, shift, and lead to the pothole reappearing.
- Hand Tamper: For smaller potholes or areas, a steel hand tamper is an indispensable tool. It allows you to apply significant downward pressure, compacting the aggregate in layers. While labor-intensive, it’s effective for localized repairs.
- Plate Compactor: For larger areas or multiple potholes, renting a mechanical plate compactor is highly recommended. These machines deliver powerful vibratory compaction, achieving much higher densities than manual tamping. This is especially important for achieving optimal lift density and ensuring the aggregate interlocks properly.
- Rolling Compression: For the final stages of compaction, especially on dirt driveways, driving a vehicle (like a truck or even a passenger car) slowly back and forth over the repaired area can provide additional rolling compression, helping to settle the material further. However, this should not replace initial mechanical or manual compaction.
The key is to compact in thin layers (typically 2-3 inches at a time) rather than attempting to compact a deep fill all at once. This ensures that the compaction force penetrates thoroughly, creating a dense and stable patch.
Step-by-Step Guide to Permanent Pothole Restoration
Achieving a permanent fix for dirt and gravel driveway potholes requires more than just filling a hole. It involves a systematic approach that addresses the underlying causes and ensures structural integrity.
Preparing the Base for Patriot Dirt Driveway Repair
The preparation phase is arguably the most critical step for a lasting repair. We begin by clearing out all loose debris, organic matter (leaves, twigs), and loose silt from within and around the pothole. Any standing water must be removed, and the area allowed to dry completely. Attempting to repair a wet pothole will result in a muddy slurry that will not compact properly and will quickly fail.
Next, and this is crucial, we must address the “hardpan ring” or “bowl effect” discussed earlier. Using a square shovel or pickaxe, we excavate the pothole to create vertical, square edges. This means cutting back the compacted material around the perimeter, extending at least 2 feet wider than the visible pothole boundary. This process breaks up the rigid bowl, removes any compromised subgrade, and creates firm, stable edges against which the new aggregate can be compacted. For deep potholes, ensure you dig down to a firm, undisturbed sub-base. The goal is to create a stable, dry foundation with strong, vertical walls that will lock the new material in place.
The Incremental Lift and Compaction Technique
With the pothole properly prepared, we move to the filling and compaction phase, which relies on the “lift and tamp” method.
- First Lift: Begin by adding the chosen aggregate (e.g., #411 crushed stone) in a thin layer, typically no more than 2 to 3 inches deep. For very deep potholes, start with a coarser base aggregate for drainage and stability.
- Moisture Application: Lightly spray the aggregate with water. The goal is to achieve optimum moisture content, where the material feels like damp beach sand that holds its shape when squeezed but isn’t saturated or muddy. This moisture acts as a lubricant, allowing the aggregate particles and fines to slide into a tighter, interlocking configuration during compaction.
- Compaction: Using your hand tamper or plate compactor, thoroughly compact the first layer. Start from the outside edges of the hole and work your way inward. This helps to lock the material against the vertical walls you created during preparation, building stability. Apply consistent, firm pressure across the entire layer.
- Repeat: Continue adding aggregate in 2-3 inch lifts, moistening, and compacting each layer thoroughly. This layered consolidation prevents air pockets and ensures uniform density throughout the patch.
- Overfill and Crown: For the final layer, slightly overfill the pothole, mounding the aggregate about an inch above the surrounding driveway grade. This accounts for any residual settling and allows for the creation of a slight crown.
- Surface Blending: Rake the final layer to blend seamlessly with the existing driveway surface, ensuring a smooth transition and helping to establish or maintain the surface crowning for proper drainage.
This incremental approach, combined with proper moisture and compaction, ensures that the aggregate interlocks tightly, creating a structurally sound repair that resists displacement and prevents future potholes from forming in the same spot.
Preventing Future Potholes with Proper Grading and Drainage
Repairing existing potholes is only half the battle; preventing new ones from forming is key to long-term driveway health. The most effective preventative measure is proper drainage management, which largely revolves around establishing and maintaining the correct driveway geometry.
Establishing the Proper Driveway Crown Slope
A well-designed dirt or gravel driveway should have a distinct center crown that allows water to shed off to the sides rather than pooling on the surface. We recommend a cross-slope geometry of 2% to 4% from the center to the shoulders. This means for every foot of driveway width, the surface should drop 1/4 to 1/2 inch from the center to the edge. For instance, a 10-foot wide driveway should be approximately 3 inches higher at its center than at its edges.
This lateral runoff is crucial. Water that flows quickly off the driveway surface has less opportunity to infiltrate the aggregate and subgrade, thus preventing the softening and erosion that lead to potholes. Regularly inspect your driveway’s crown, especially after heavy rains, to ensure it maintains this critical slope. If you notice areas where water consistently pools, it’s a strong indication that your crown needs adjustment or restoration.
Long-Term Maintenance After Patriot Dirt Driveway Repair
Even with the best repair techniques and proper crowning, ongoing maintenance is essential to keep your unpaved driveway in top condition.
- Seasonal Grading: We recommend routine surface grading several times a year, or at least annually, using equipment like a box blade, land plane, or tractor-towed grading attachment. This redistributes aggregate, smooths out minor imperfections, and helps maintain the proper crown.
- Pothole Inspection: Regularly inspect your driveway, particularly after heavy rainfall or freeze-thaw cycles. Address small dips and ruts as soon as they appear, before they have a chance to develop into full-blown potholes. Early intervention is always more effective and less labor-intensive.
- Aggregate Recovery: Over time, aggregate can migrate off the driveway edges or be pushed into ditches. Periodically recover this material and redistribute it evenly across the driveway surface. This not only saves money on new material but also helps maintain the correct aggregate depth.
- Rut Prevention: Encourage drivers to vary their paths slightly on the driveway to prevent the formation of deep ruts, which can channel water and accelerate pothole development.
- Ditch and Culvert Maintenance: Keep side ditches and culverts clear of debris, leaves, and sediment. Blocked drainage pathways will cause water to back up and saturate the driveway’s subgrade, undermining even the most meticulously done repairs. Inspect these at least twice a year.
By proactively managing your driveway’s drainage and performing routine maintenance, you can significantly extend the life of your repairs and prevent future pothole headaches.
Frequently Asked Questions About Dirt Driveway Pothole Repair
We often encounter common questions regarding the best practices for dirt driveway pothole repair. Here are some of the most frequent inquiries and our recommendations for ensuring repair longevity and structural stability.
Why do potholes keep returning in the exact same spot?
Potholes that repeatedly reappear in the same location are a clear sign that the initial repair did not address the root cause. This usually stems from two primary issues:
- Unaddressed Hardpan Edges: As discussed, a pothole forms a compacted “bowl” with rigid edges. If these hardpan edges are not broken up and excavated during the repair, they act as a container that prevents new, loose fill material from integrating properly. Vehicle traffic then easily pushes this uncompacted fill out of the bowl, causing the pothole to re-form.
- Persistent Drainage Issues: If standing water continues to collect in or around the repaired area, it indicates an underlying drainage problem. Subgrade failure due to chronic saturation will inevitably lead to the breakdown of any repair, as the foundation remains unstable. Lateral movement of aggregate under traffic, exacerbated by water, will also contribute to the pothole’s return.
To prevent recurrence, fully excavate and square off the pothole, ensure thorough compaction of new material, and, most importantly, correct any drainage deficiencies.
Can you fix a pothole while it still contains standing water?
No, we strongly advise against attempting to fix a pothole that contains standing water. Doing so will inevitably lead to a failed repair for several reasons:
- Mud Slurry: Mixing new aggregate with water and saturated soil will create a muddy slurry. This material cannot be properly compacted; it lacks the necessary interlocking properties to form a stable base.
- Compaction Loss: Water fills the voids between aggregate particles, preventing them from settling tightly together. This results in significant compaction loss, meaning the repair will quickly settle and sink under vehicle weight.
- Subgrade Softening: The presence of standing water indicates a saturated subgrade, which is already weakened. Adding more material to a soft, wet foundation will not provide structural stability.
- Adhesion Failure: New material will not properly adhere or bind with a wet, unstable base, leading to the patch easily dislodging.
Always allow the pothole to dry out completely before beginning any repair work. If necessary, you can use a wet/dry shop vac to remove standing water, or simply wait for dry weather and natural evaporation.
What is the ideal time of year to repair an unpaved driveway?
The best time of year for repairing unpaved driveways is typically during the dry season, which for many regions means late spring through early fall (e.g., July through September in areas like Western Washington before the fall rains).
- Dry Conditions: Repairing when the ground is dry ensures that the subgrade is firm and any new aggregate can be properly compacted without interference from excess moisture. This is crucial for long-term stability.
- Summer Grading: Warmer, drier months are also ideal for general summer grading and maintenance, as the material is easier to work with and compact.
- Pre-Freeze Repairs: In climates with freeze-thaw cycles, performing repairs before the ground freezes in late fall can prevent water from infiltrating new patches and causing damage over winter.
- Soil Moisture: While completely dry conditions are preferred, a slight amount of soil moisture (optimum moisture content) can aid in compaction, but this is distinct from saturated or standing water.
Avoiding repairs during rainy seasons, periods of heavy frost, or when the ground is muddy will significantly increase the chances of a successful and lasting repair.
Conclusion
Tackling potholes in your dirt or gravel driveway might seem like a daunting task, but with the right knowledge and approach, you can achieve permanent solutions that stand the test of time. We’ve explored how factors like water, vehicle traffic, and the problematic “bowl effect” contribute to pothole formation, and how understanding these mechanics is key to effective repair.
By meticulously preparing the pothole with vertical, squared edges, selecting the appropriate angular aggregate with fines, and employing the incremental lift and compaction technique, you can restore structural durability to your driveway. Equally important are preventative measures: establishing and maintaining a proper driveway crown and ensuring clear drainage pathways will protect your investment for years to come.
A well-maintained dirt or gravel driveway not only enhances the aesthetic appeal of your property but also provides a safer, smoother surface for vehicles, reducing wear and tear. By implementing these strategies, you can enjoy a reliable, bump-free path home, transforming a persistent problem into a testament to proactive maintenance and long-term value.